What is Bluesky?
Bluesky is a decentralized social networking protocol designed to create a more open and user-controlled internet. It was initially funded by Twitter in 2019 but later became an independent organization. Bluesky aims to move away from centralized control of social media platforms, allowing users to own their data, choose their algorithms, and self-host their identities.
Bluesky vs. Other Social Media
| Feature | Bluesky (AT Protocol) | Twitter (X) | Mastodon (ActivityPub) |
|---|---|---|---|
| Decentralized | ✅ Yes | ❌ No | ✅ Yes |
| User-Controlled Algorithms | ✅ Yes | ❌ No | ❌ No |
| Data Ownership | ✅ User-Owned | ❌ Platform-Owned | ✅ User-Owned |
| Federation | ✅ Yes | ❌ No | ✅ Yes |
| Self-Hosting Possible | ✅ Yes | ❌ No | ✅ Yes |
Step-by-Step Guide: Self-Hosting a Bluesky Personal Data Server on Ubuntu VPS
Bluesky’s decentralized social networking protocol (AT Protocol) allows users to self-host their own personal data servers (PDS). This guide provides a step-by-step process for self-hosting a Bluesky personal data server on Ubuntu VPS.
Prerequisites
Before starting, ensure you have:
- A VPS running Ubuntu (20.04 or later)
- A domain name (for federation and HTTPS setup)
- If necessary, register a new domain from Rad Web Hosting (Domain Pricing)
- Basic knowledge of Linux command-line usage
- Root-equivalent SSH access to the VPS (Guide)
- Public IPv4 Address
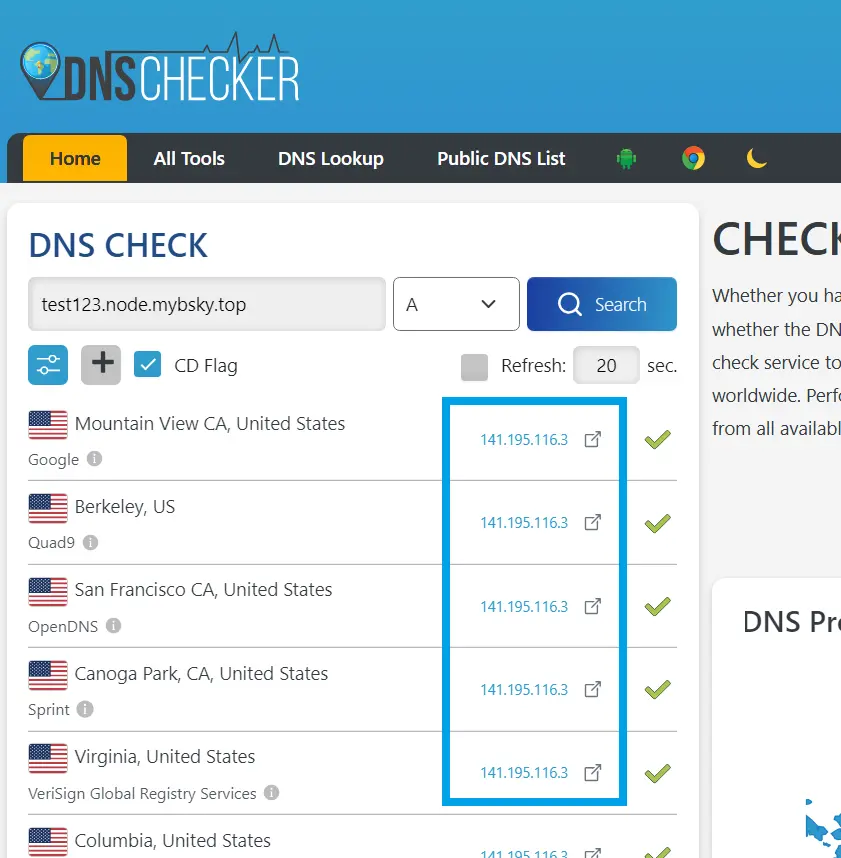
- Public DNS (Fully-Qualified Domain Name)
- Verify using DNS Checker:
- Verify using DNS Checker:
- Ports 80, 443 (TCP) open (Guide: How to Open Ports on Linux Server)
-
Set Up Your Ubuntu VPS
-
Update and Upgrade Ubuntu
First, update your system to ensure you have the latest packages:
sudo apt update && sudo apt upgrade -y
-
Install Required Dependencies
Ensure basic tools are installed:
sudo apt install -y curl git unzip wget build-essential
-
-
Set Up a User for Bluesky PDS
It’s good practice to create a non-root user to manage the server:
sudo adduser bluesky
sudo usermod -aG sudo bluesky
Switch to the new user:
su - bluesky
-
Install Docker and Docker Compose
Bluesky’s PDS (Personal Data Server) can run inside a Docker container.
-
Install Docker
curl -fsSL https://get.docker.com | sudo bash
sudo usermod -aG docker $(whoami)
Log out and log back in for changes to take effect.
-
Install Docker Compose
sudo apt install -y docker-compose
Verify installation:
docker --version
docker-compose --version
-
-
Clone the Bluesky PDS Repository
Navigate to your home directory and clone the official Bluesky PDS repository:
git clone https://github.com/bluesky-social/pds.git
cd pds
-
Configure Environment Variables
Copy the sample environment file:
cp .env.example .env
Edit the
.envfile usingnanoorvim:nano .env
Modify key variables:
- ADMIN_PASSWORD (Set a strong admin password)
- PDS_HOSTNAME (Set your domain, e.g.,
pds.yourdomain.com) - DBHOST, DBUSER, DB_PASSWORD (for PostgreSQL database)
- EMAIL_SERVER (for user email verification)
Save and exit (
CTRL + X, thenY, thenEnter). -
Set Up PostgreSQL Database
Bluesky PDS requires PostgreSQL.
-
Install PostgreSQL
sudo apt install -y postgresql postgresql-contrib
-
Create a Database and User
Access PostgreSQL:
sudo -u postgres psql
Run the following commands:
CREATE DATABASE bluesky_pds;
CREATE USER bluesky_user WITH PASSWORD 'strongpassword';
ALTER DATABASE bluesky_pds OWNER TO bluesky_user;
GRANT ALL PRIVILEGES ON DATABASE bluesky_pds TO bluesky_user;
Exit with:
\q
-
Update Database Configuration
Edit the
.envfile again to match:nano .env
Set:
DB_HOST=localhost
DB_PORT=5432
DB_USER=bluesky_user
DB_PASSWORD=strongpassword
DB_NAME=bluesky_pds
-
-
Set Up Reverse Proxy with Nginx
To expose your PDS with a proper domain and HTTPS, set up Nginx.
-
Install Nginx
sudo apt install -y nginx
-
Configure Nginx for Bluesky PDS
Create a new configuration file:
sudo nano /etc/nginx/sites-available/bluesky
Paste the following:
server {
    listen 80;
    server_name pds.yourdomain.com;

    location / {
        proxy_pass http://localhost:3000;
        proxy_set_header Host $host;
        proxy_set_header X-Real-IP $remote_addr;
        proxy_set_header X-Forwarded-For $proxy_add_x_forwarded_for;
        proxy_set_header X-Forwarded-Proto $scheme;
    }
}
Save and exit.
-
Enable the Configuration
sudo ln -s /etc/nginx/sites-available/bluesky /etc/nginx/sites-enabled/
sudo nginx -t
sudo systemctl restart nginx
-
-
Obtain an SSL Certificate
To secure your instance with HTTPS, install Certbot for Let’s Encrypt:
sudo apt install -y certbot python3-certbot-nginx
sudo certbot --nginx -d pds.yourdomain.com
Follow the prompts and ensure HTTPS works.
-
Start the Bluesky PDS
Now, launch the server using Docker:
docker-compose up -d
This will download and start the Bluesky PDS.
Check if the container is running:
docker ps
Check logs for errors:
docker-compose logs -f
-
Verify the PDS
-
Check if Bluesky PDS is Running
Test if the server is accessible:
curl -X GET https://pds.yourdomain.com/xrpc/com.atproto.server.describeServer
It should return server details.
-
Register and Configure Your Server
- Visit
https://pds.yourdomain.com/admin - Log in with the admin password set in
.env - Configure federation settings
- Visit
-
-
Maintain Your Server
-
Restarting and Stopping PDS
To restart:
docker-compose restart
To stop:
docker-compose down
-
Updating Bluesky PDS
To update:
cd pds
git pull origin main
docker-compose up --build -d
-
Set Up Automatic SSL Renewal
Let’s Encrypt certificates expire every 90 days. Set up auto-renewal:
sudo crontab -e
Add:
0 3 * * * certbot renew --quiet
-
-
Join Bluesky Federation
To federate your instance:
- Register your PDS on Bluesky’s AT Protocol network.
- Ensure DNS records are correct for your domain.
- Monitor logs for federation activity.
Setup Custom Scripts for Personal Data Server Monitoring
To ensure your Bluesky Personal Data Server (PDS) is running smoothly, we can set up custom monitoring scripts using systemd, cron, and a simple health-check script that alerts via email or logs issues.
Follow the steps below to setup custom monitoring and alerting scripts:
-
Create a Health Check Script
We will write a script that:
- Checks if the Bluesky PDS container is running.
- Pings the PDS endpoint for a valid response.
- Logs issues and sends an alert if the server is down.
-
Create the Monitoring Script
sudo nano /opt/bluesky_pds_monitor.sh
Paste the following script:
#!/bin/bash

# Variables
PDS_URL="https://pds.yourdomain.com/xrpc/com.atproto.server.describeServer"
LOG_FILE="/var/log/bluesky_pds_monitor.log"
EMAIL="your-email@example.com"

# Check if the Docker container is running
CONTAINER_NAME="pds"
if ! docker ps | grep -q "$CONTAINER_NAME"; then
    echo "$(date): PDS container is DOWN!" | tee -a "$LOG_FILE"
    echo "PDS container is DOWN on $(hostname)" | mail -s "Bluesky PDS Alert" $EMAIL
    docker-compose -f /home/bluesky/pds/docker-compose.yml restart
    exit 1
fi

# Check if the PDS server responds
RESPONSE=$(curl -s -o /dev/null -w "%{http_code}" $PDS_URL)

if [ "$RESPONSE" -ne 200 ]; then
    echo "$(date): PDS server is NOT RESPONDING ($RESPONSE)" | tee -a "$LOG_FILE"
    echo "Bluesky PDS is NOT RESPONDING ($RESPONSE) on $(hostname)" | mail -s "Bluesky PDS Alert" $EMAIL
    docker-compose -f /home/bluesky/pds/docker-compose.yml restart
else
    echo "$(date): PDS is running fine." >> "$LOG_FILE"
fi
Save and exit (
CTRL + X, thenY, thenEnter).
-
Make the Script Executable
sudo chmod +x /opt/bluesky_pds_monitor.sh
-
Automate Monitoring Using Cron
To run the script every 5 minutes, add it to
cron:sudo crontab -e
Add the following line:
*/5 * * * * /opt/bluesky_pds_monitor.sh
Save and exit.
-
Systemd Service for Persistent Monitoring
Instead of relying only on
cron, we can create a systemd service that ensures the PDS stays active.-
Create a Systemd Service File
sudo nano /etc/systemd/system/bluesky_pds.service
Paste the following:
[Unit]
Description=Bluesky Personal Data Server
After=network.target

[Service]
User=bluesky
WorkingDirectory=/home/bluesky/pds
ExecStart=/usr/bin/docker-compose up
Restart=always
RestartSec=10
KillMode=mixed
StandardOutput=syslog
StandardError=syslog
SyslogIdentifier=bluesky_pds

[Install]
WantedBy=multi-user.target
Save and exit.
-
-
Enable and Start the Service
sudo systemctl daemon-reload
sudo systemctl enable bluesky_pds
sudo systemctl start bluesky_pds
To check its status:
sudo systemctl status bluesky_pds
To restart it manually:
sudo systemctl restart bluesky_pds
-
Log Rotation for Monitoring Logs
Since logs can grow large over time, we set up log rotation.
Create a logrotate configuration file:
sudo nano /etc/logrotate.d/bluesky_pds_monitor
Add:
/var/log/bluesky_pds_monitor.log {
    weekly
    rotate 4
    compress
    missingok
    notifempty
}
Save and exit.
-
Test the Monitoring Setup
Run the monitoring script manually:
sudo /opt/bluesky_pds_monitor.sh
Check logs:
cat /var/log/bluesky_pds_monitor.log
Overview of Monitoring Behavior
Now, your Bluesky PDS server is actively monitored. If the server crashes, it:
- Auto-restarts using
docker-compose. - Logs errors and keeps a history.
- Sends email alerts when issues occur.
Integrating Grafana Monitoring and Telegram Notifications for Bluesky PDS
To enhance monitoring for your Bluesky Personal Data Server (PDS), we will:
- Set up Prometheus for system and Docker metrics
- Use Grafana to visualize metrics
- Set up Telegram alerts for critical failures
To get started, please follow the steps provided:
-
Install and Configure Prometheus
-
Install Prometheus
sudo useradd --no-create-home --shell /bin/false prometheus
sudo mkdir /etc/prometheus /var/lib/prometheus
sudo chown prometheus:prometheus /etc/prometheus /var/lib/prometheus
Download and install Prometheus:
cd /tmp
curl -LO "https://github.com/prometheus/prometheus/releases/latest/download/prometheus-$(uname -m)-linux-gnu.tar.gz"
tar -xvzf prometheus-*-linux-gnu.tar.gz
sudo mv prometheus-*/prometheus /usr/local/bin/
sudo mv prometheus-*/promtool /usr/local/bin/
sudo mv prometheus-*/consoles /etc/prometheus/
sudo mv prometheus-*/console_libraries /etc/prometheus/
-
Configure Prometheus
sudo nano /etc/prometheus/prometheus.yml
Paste the following:
global:
  scrape_interval: 15s

scrape_configs:
  - job_name: 'prometheus'
    static_configs:
      - targets: ['localhost:9090']

  - job_name: 'docker'
    static_configs:
      - targets: ['localhost:9323']
Save and exit.
-
Create a Systemd Service for Prometheus
sudo nano /etc/systemd/system/prometheus.service
Paste:
[Unit]
Description=Prometheus Monitoring
Wants=network-online.target
After=network-online.target

[Service]
User=prometheus
ExecStart=/usr/local/bin/prometheus --config.file=/etc/prometheus/prometheus.yml --storage.tsdb.path=/var/lib/prometheus --web.listen-address="0.0.0.0:9090"
Restart=always

[Install]
WantedBy=multi-user.target
Enable and start Prometheus:
sudo systemctl daemon-reload
sudo systemctl enable prometheus
sudo systemctl start prometheus
-
-
Install and Configure Grafana
-
Install Grafana
sudo apt install -y software-properties-common
sudo add-apt-repository "deb https://packages.grafana.com/oss/deb stable main"
sudo apt update && sudo apt install -y grafana
Start Grafana:
sudo systemctl enable --now grafana-server
-
Access Grafana
Visit
http://your-server-ip:3000and login with:- Username: admin
- Password: admin
Change the password after logging in.
-
-
Add Prometheus Data Source to Grafana
- Go to Grafana → Settings → Data Sources
- Click Add Data Source
- Choose Prometheus
- Set URL:
http://localhost:9090 - Click Save & Test
-
Install and Configure Node Exporter
To monitor CPU, RAM, and disk usage:
cd /tmp
curl -LO "https://github.com/prometheus/node_exporter/releases/latest/download/node_exporter-$(uname -m)-linux-gnu.tar.gz"
tar -xvzf node_exporter-*-linux-gnu.tar.gz
sudo mv node_exporter-*/node_exporter /usr/local/bin/
Create a service:
sudo nano /etc/systemd/system/node_exporter.service
Paste:
[Unit]
Description=Node Exporter
After=network.target

[Service]
ExecStart=/usr/local/bin/node_exporter
Restart=always
User=root

[Install]
WantedBy=default.target
Enable and start:
sudo systemctl daemon-reload
sudo systemctl enable node_exporter
sudo systemctl start node_exporter
-
Configure Telegram Alerts in Grafana
-
Create a Telegram Bot
-
- Open Telegram and search for @BotFather
- Send
/newbot - Follow the instructions and get the Bot Token
- Add the bot to a Telegram group and get the Chat ID using:
curl "https://api.telegram.org/bot/getUpdates"
- Save the Bot Token and Chat ID.
-
-
-
Configure Telegram in Grafana
- Go to Grafana → Alerting → Notification Channels
- Click Add Channel
- Name:
Telegram - Type:
Telegram - Bot API Token:
- Chat ID:
- Click Save & Test
-
Create Alerts for Bluesky PDS
-
Add an Alert in Grafana
- Open Grafana and go to Dashboards.
- Create a new panel with:
query: up{job="node"} - Click Alert → Create Alert Rule
- Set:
- Condition:
When value < 1 - For:
1m - Notification Channel:
Telegram
- Condition:
- Click Save & Apply
-
-
Verify Monitoring & Alerts
- Restart Bluesky PDS and check Prometheus metrics:
systemctl restart bluesky_pds
- Simulate a failure:
docker stop pds
- Check if Grafana triggers a Telegram alert.
- Restart Bluesky PDS and check Prometheus metrics:
Summary of Grafana Monitors and Telegram Notifications
🎉 You now have Bluesky PDS monitoring with:
✅ Prometheus for metrics
✅ Grafana for dashboards
✅ Telegram alerts for failures
Create Auto-Recovery Scripts for Bluesky PDS
To ensure Bluesky Personal Data Server (PDS) recovers automatically from failures, we will:
- Monitor PDS health
- Restart the service if down
- Trigger Telegram alerts
- Set up systemd and cron for self-healing
-
Create the Auto-Recovery Script
The script will:
✅ Check if the Docker container is running
✅ Restart the container if needed
✅ Log failures
✅ Send Telegram alerts-
Create the Script
sudo nano /opt/bluesky_auto_recovery.sh
Paste the following:
#!/bin/bash

# Configuration
PDS_CONTAINER="pds"
PDS_URL="https://pds.yourdomain.com/xrpc/com.atproto.server.describeServer"
LOG_FILE="/var/log/bluesky_auto_recovery.log"
TELEGRAM_BOT_TOKEN="your_bot_token"
TELEGRAM_CHAT_ID="your_chat_id"

# Function to send Telegram alerts
send_telegram_alert() {
    MESSAGE="$1"
    curl -s -X POST "https://api.telegram.org/bot$TELEGRAM_BOT_TOKEN/sendMessage" \
        -d chat_id="$TELEGRAM_CHAT_ID" \
        -d text="$MESSAGE"
}

# Check if Docker is running
if ! systemctl is-active --quiet docker; then
    echo "$(date): Docker is DOWN. Restarting..." | tee -a "$LOG_FILE"
    send_telegram_alert "🚨 ALERT: Docker is DOWN on $(hostname). Restarting..."
    sudo systemctl restart docker
fi

# Check if the PDS container is running
if ! docker ps | grep -q "$PDS_CONTAINER"; then
    echo "$(date): PDS container is DOWN! Restarting..." | tee -a "$LOG_FILE"
    send_telegram_alert "⚠️ WARNING: Bluesky PDS is DOWN! Restarting now..."
    docker-compose -f /home/bluesky/pds/docker-compose.yml up -d
fi

# Check if PDS is responding
HTTP_STATUS=$(curl -s -o /dev/null -w "%{http_code}" "$PDS_URL")

if [ "$HTTP_STATUS" -ne 200 ]; then
    echo "$(date): PDS is NOT RESPONDING ($HTTP_STATUS). Restarting..." | tee -a "$LOG_FILE"
    send_telegram_alert "❌ Bluesky PDS is NOT RESPONDING ($HTTP_STATUS). Restarting..."
    docker-compose -f /home/bluesky/pds/docker-compose.yml restart
else
    echo "$(date): PDS is running fine." >> "$LOG_FILE"
fi
Save and exit (
CTRL + X, thenY, thenEnter).
-
-
Make the Script Executable
sudo chmod +x /opt/bluesky_auto_recovery.sh
-
Automate Recovery Using Cron
To check every 5 minutes, add it to
cron:sudo crontab -e
Add:
*/5 * * * * /opt/bluesky_auto_recovery.sh
Save and exit.
-
Set Up Systemd for Automatic Restart
Instead of relying only on cron, we use systemd to ensure PDS restarts if it crashes.
-
Create a Systemd Service File
sudo nano /etc/systemd/system/bluesky_auto_recovery.service
Paste:
[Unit]
Description=Bluesky PDS Auto-Recovery Service
After=network.target docker.service

[Service]
ExecStart=/opt/bluesky_auto_recovery.sh
Restart=always
RestartSec=30
User=root

[Install]
WantedBy=multi-user.target
Save and exit.
-
-
Enable and Start the Service
sudo systemctl daemon-reload
sudo systemctl enable bluesky_auto_recovery
sudo systemctl start bluesky_auto_recovery
To check its status:
sudo systemctl status bluesky_auto_recovery
To restart manually:
sudo systemctl restart bluesky_auto_recovery
-
Test the Auto-Recovery System
-
Simulate a Failure
Stop the PDS container manually:
docker stop pds
Check logs:
tail -f /var/log/bluesky_auto_recovery.log
It should detect the failure, restart PDS, and send a Telegram alert.
-
Simulate an Unresponsive PDS
Block PDS temporarily:
iptables -A INPUT -p tcp --dport 3000 -j DROP
Wait 5 minutes and check logs & Telegram alerts.
To unblock:
iptables -D INPUT -p tcp --dport 3000 -j DROP
-
Self-Healing Sequence Summary
✅ Auto-recovery script to restart PDS
✅ Telegram alerts for failures
✅ Systemd service for persistent monitoring
✅ Cron job for regular health checks
Now, your Bluesky PDS is self-healing! 🎉
Conclusion
Congratulations! 🎉 You’ve successfully self-hosted a Bluesky Personal Data Server on an Ubuntu VPS. Your server is now part of the decentralized Bluesky network.
Additionally, you’ve enabled:
- Automated Service monitors via custom scripting
- Grafana Dashboard monitoring and Telegram notifications
- Self-healing: Automatic service recovery in case of failure.
Resources
Further resources for managing your Bluesky personal data server:
- Bluesky PDS GitHub Issues: https://github.com/bluesky-social/pds
- Logs (
docker-compose logs -f) to debug errors.


[…] Self-Hosting a Bluesky Personal Data Server on Ubuntu VPS […]