If you’re looking to run a robust open-source helpdesk on your AlmaLinux VPS, Zammad is a great pick. It’s modern, feature-packed, and supports everything from ticketing to chat and reporting. This guide will walk you through installing Zammad step by step.
What is Zammad?
Zammad is an open-source helpdesk and customer support system designed to help teams manage communication with customers across multiple channels. It provides a central place for handling tickets, emails, chats, phone calls, social media messages (like Twitter and Facebook), and more.
Key Features of Zammad:
- Ticketing System: Centralized management of support requests (tickets).
- Multi-Channel Support: Integrates with email, web forms, chat, Twitter, Facebook, and phone systems.
- User Roles & Permissions: Granular control over what users and agents can access.
- Full-Text Search: Fast and intuitive search across all tickets and customer data.
- Knowledge Base: Built-in self-service portal to reduce repetitive tickets.
- Time Tracking: Keep track of how much time is spent on tickets.
- API Access: REST API for integrations and automations.
- Modern UI: Built with a responsive, user-friendly interface.
- Self-hosted : Available as a self-hosted app (great for privacy)
Ideal Use Cases:
- IT support desks
- Customer service teams
- Managed service providers
- Web hosting companies
- Any business needing structured support workflows
🛠️ Requirements
Before you begin, make sure you have:
- AlmaLinux 8 or AlmaLinux 9 VPS
- Root or sudo access
- At least 2 GB RAM (4 GB+ recommended)
- A domain name (optional, but useful for production)
- SELinux disabled
How to Install Zammad on AlmaLinux VPS
To install Zammad on AlmaLinux VPS, follow the steps below:
-
Update the System
sudo dnf update -y
sudo dnf install epel-release nano -y
sudo dnf install imlib2 -y
-
Set Hostname (Optional but Recommended)
hostnamectl set-hostname support.yourdomain.com
Add your IP and hostname to
/etc/hosts:sudo nano /etc/hosts
Example entry:
127.0.0.1 support.yourdomain.com support
-
Disable SELinux (or set to permissive)
Check status:
sestatus
If enforcing, set to permissive:
sudo setenforce 0
To make it permanent:
sudo nano /etc/selinux/config
Change:
SELINUX=permissive
Reboot if needed.
-
Add Dependencies
sudo dnf install postgresql nginx nodejs redis memcached sqlite-devel libyaml libyaml-devel -y
curl -fsSL https://get.pnpm.io/install.sh | sh -
-
Add Elasticsearch
sudo tee /etc/yum.repos.d/elasticsearch.repo << EOF
[elasticsearch-7.x]
name=Elasticsearch repository for 7.x packages
baseurl=https://artifacts.elastic.co/packages/7.x/yum
gpgcheck=1
gpgkey=https://artifacts.elastic.co/GPG-KEY-elasticsearch
enabled=1
autorefresh=1
type=rpm-md
EOF
Install Elasticsearch:
sudo dnf install java-11-openjdk-devel -y
rpm --import https://artifacts.elastic.co/GPG-KEY-elasticsearch
sudo dnf install elasticsearch -y
Configure Elasticsearch:
sudo nano /etc/elasticsearch/elasticsearch.yml
Add the following:
cluster.name: es-almalinux
node.name: es-node
network.host: 127.0.0.1
Start and enable Elasticsearch:
sudo systemctl daemon-reload
sudo systemctl start elasticsearch
sudo systemctl enable elasticsearch
-
Add Zammad Repository
Zammad provides its own YUM repo:
sudo rpm --import https://dl.packager.io/srv/zammad/zammad/key
sudo wget -O /etc/yum.repos.d/zammad.repo \
https://dl.packager.io/srv/zammad/zammad/stable/installer/el/8.repo
(Replace
/el/8.repowith/el/9.repoif you’re using AlmaLinux 9.) -
Install Zammad
sudo dnf install zammad -y
sudo chmod -R 755 /opt/zammad/public/
This will install:
- Zammad app
- Nginx (as web server)
- PostgreSQL (as database)
- Elasticsearch (for search functionality)
- Systemd services
-
Start and Enable Services
sudo systemctl enable --now zammad
sudo systemctl enable --now elasticsearch
sudo systemctl enable --now nginx
-
Configure Firewall
Open required ports:
sudo firewall-cmd --permanent --add-service=http
sudo firewall-cmd --permanent --add-service=https
sudo firewall-cmd --reload
-
Access Zammad Web Installer
Open your browser and go to:
http://your-server-ip/
Or:
http://support.yourdomain.com/
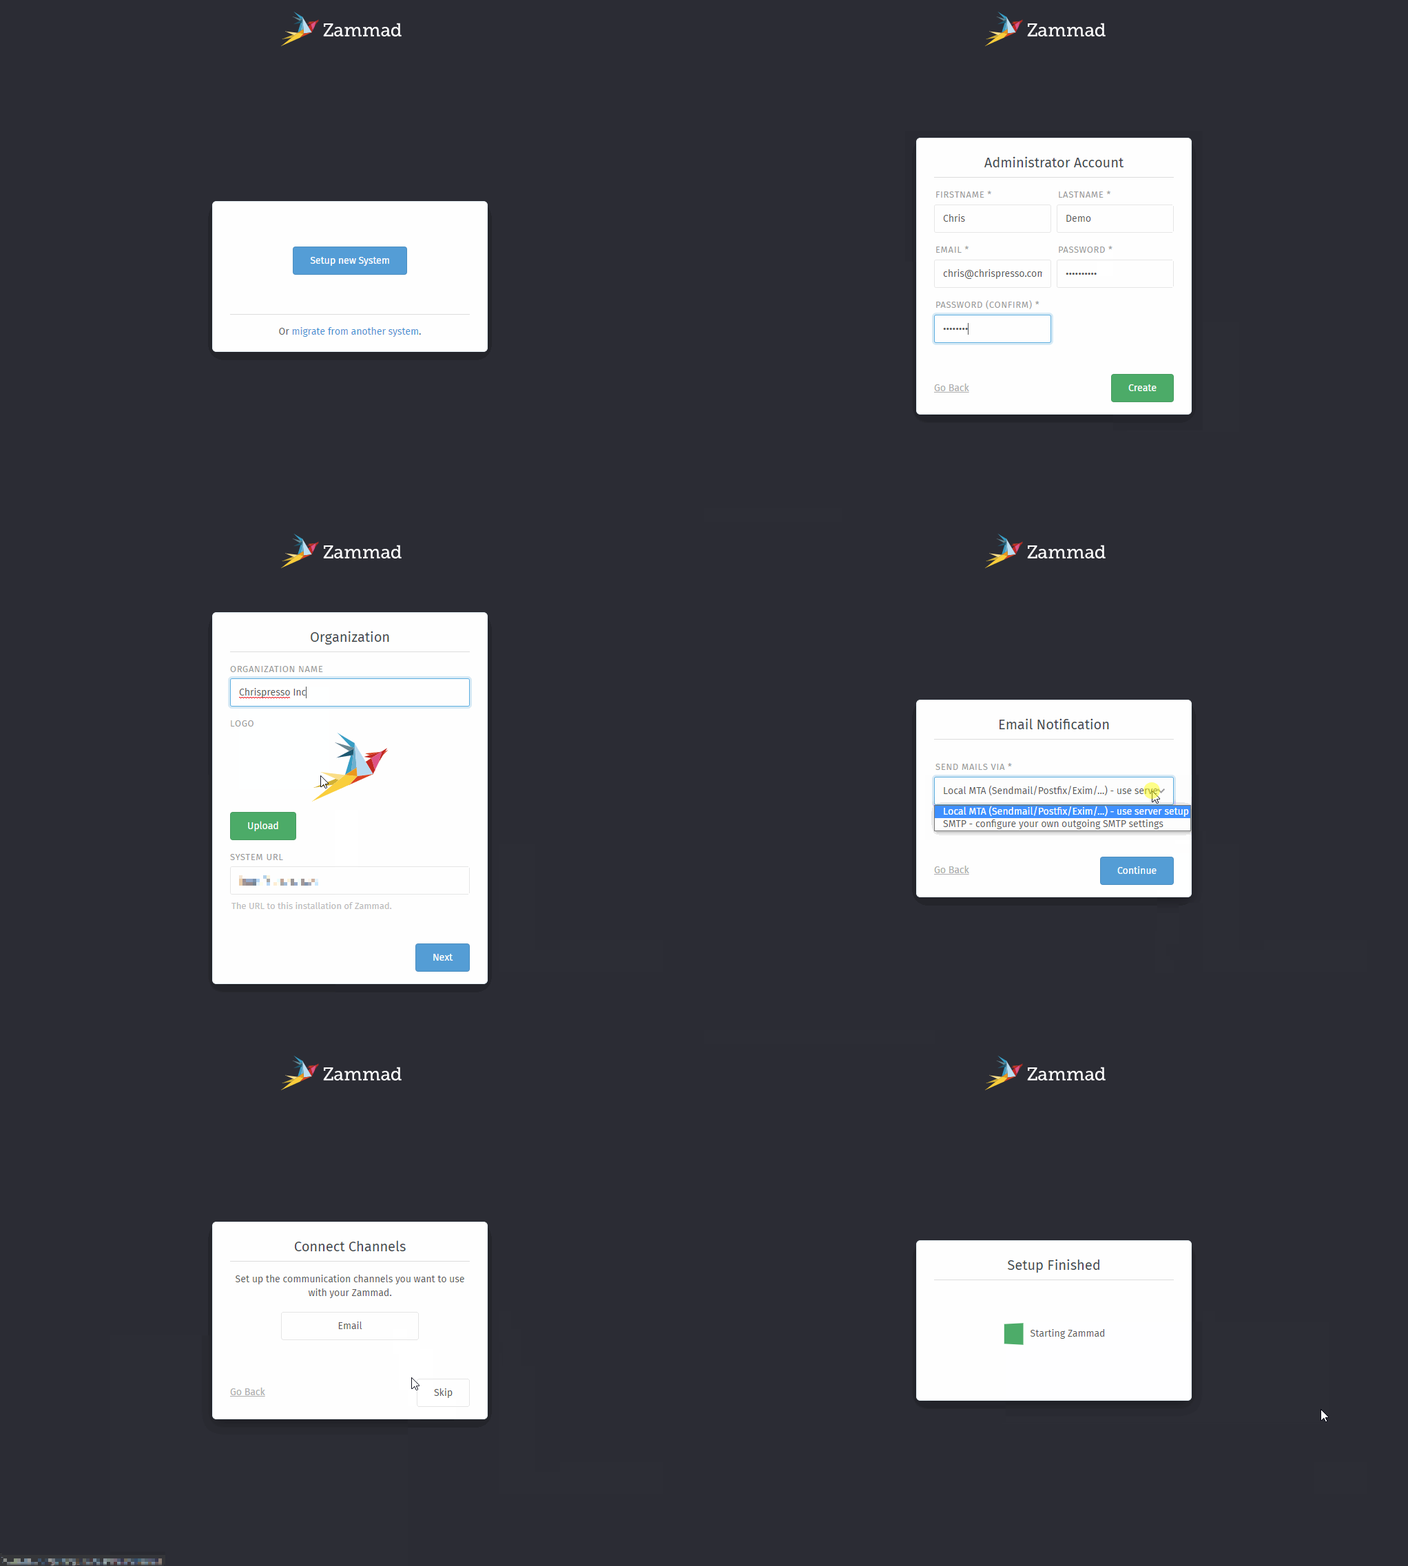
Follow the web-based setup wizard to:
- Create an admin user
- Configure email (for ticketing)
- Connect Slack or chat (optional)
- Set branding
-
Secure with SSL (Recommended)
Install Certbot:
sudo dnf install certbot python3-certbot-nginx -y
Edit Nginx configuration:
sudo nano /etc/nginx/nginx.conf
Configure ServerName directive:
    server {
        server_name  support.yourdomain.com;
        root         /usr/share/nginx/html;
Run Certbot:
sudo certbot --nginx -d support.yourdomain.com
Follow the prompts to get your free Let’s Encrypt SSL cert.
Set up auto-renewal:
echo "0 3 * * * root certbot renew --quiet" | sudo tee -a /etc/crontab
-
You’re Done 🎉
Zammad should now be fully operational. Log into the admin interface and start customizing workflows, email templates, triggers, and user roles.
✅ Tips
- Keep Zammad and your server updated.
- Set up regular backups (use
zammad run rakefor exporting data). - Monitor logs (
/var/log/zammad/) for issues.
Troubleshooting
Port 9200 not open? Elasticsearch might not be running. Restart it:
sudo systemctl restart elasticsearch
Permission issues? Run:
sudo zammad run rake zammad:permissions:reset
Got questions or hit an issue? Drop a comment or check out Zammad’s docs—they’re well-written and active.
Conclusion
You now know how to install Zammad on AlmaLinux VPS.


 Follow the web-based setup wizard to:


