This article provides a guide for how to integrate VPS Reseller with WHMCS. We will start by installing the WHMCS module for reselling VPS Servers. Follow the guide below to integrate VPS Reseller WHMCS module, and enable API and module connection to resell VPS hosting.
RECOMMENDED GUIDE: 5 Minute Guide to Integrate WHMCS VPS Reseller
Getting Started with VPS Reseller with WHMCS
Please follow the below guidelines to configure your VPS Reseller with WHMCS integration.
Prerequisites
- WHMCS installation
- VPS Reseller account
- WHMCS server has ports 4081-4085 open
Install WHMCS VPS Module
- Download and extract the WHMCS integration [HERE].
- Copy the entire directory via FTP, SFTP, SCP, etc. to WHMCS directory
- Ensure the existence of /<WHMCS_PATH>/modules/servers/rad_cloud
- Ensure the existence of /<WHMCS_PATH>/modules/addons/rwhserverimport
Get API Credentials
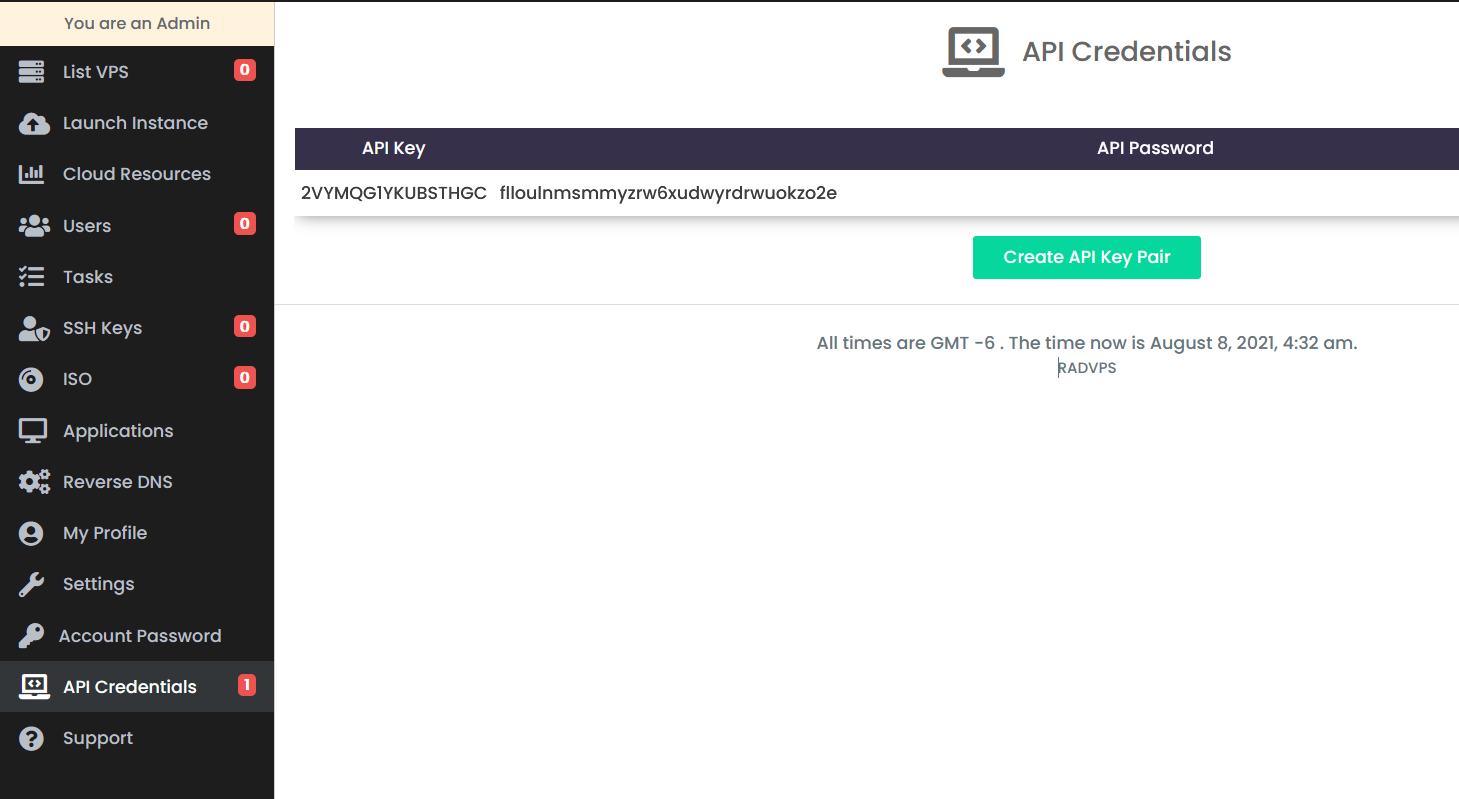
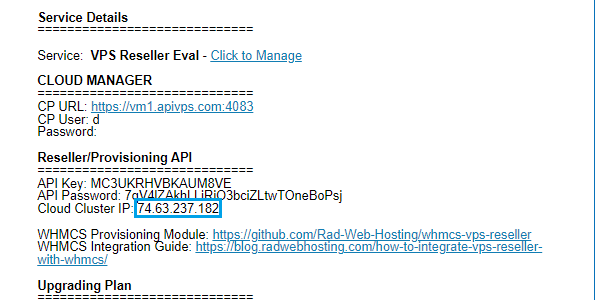
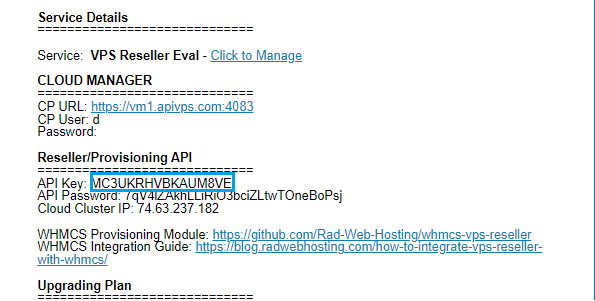
- A VPS Reseller Welcome Email was sent with the required API Credentials after payment confirmation.
- In case you do not have this email, you can view it in your Rad Web Hosting client dashboard.
- Login to Rad Web Hosting client dashboard.
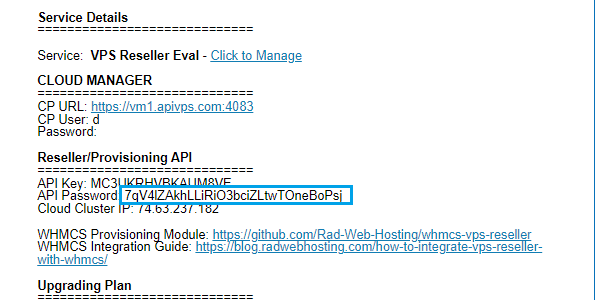
- Retrieve API key and Secret from VPS Reseller Welcome Email (Subject: “Your VPS Reseller Account is Deployed”). View guide: Viewing Email History in Hosting Dashboard
- Copy the API key pair credentials (these will be needed to configure WHMCS server connection).
Create Server in WHMCS Admin
You must now create a server in the WHMCS admin.
- Login to your WHMCS admin area.
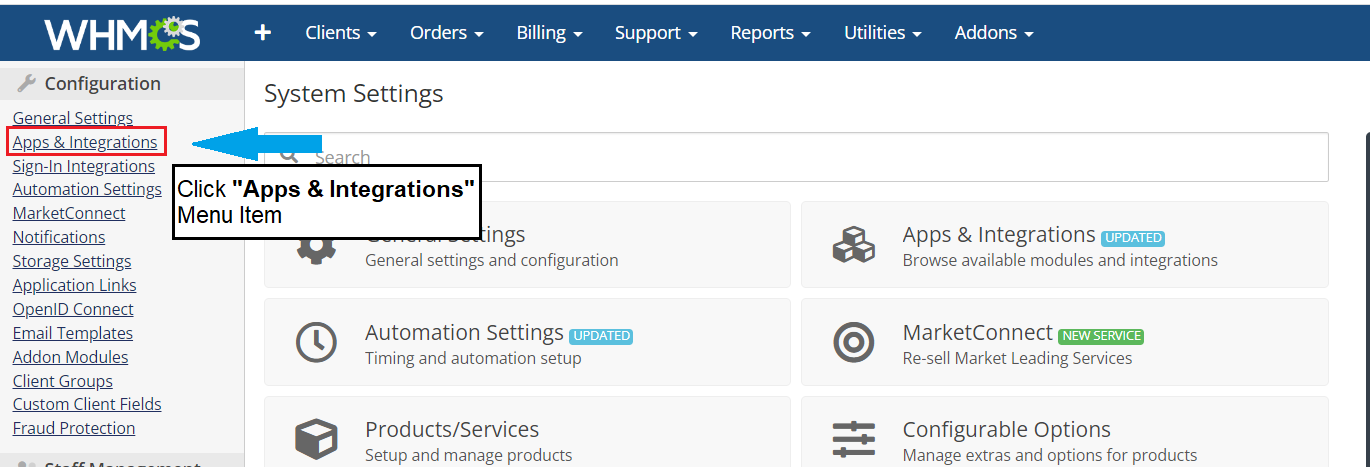
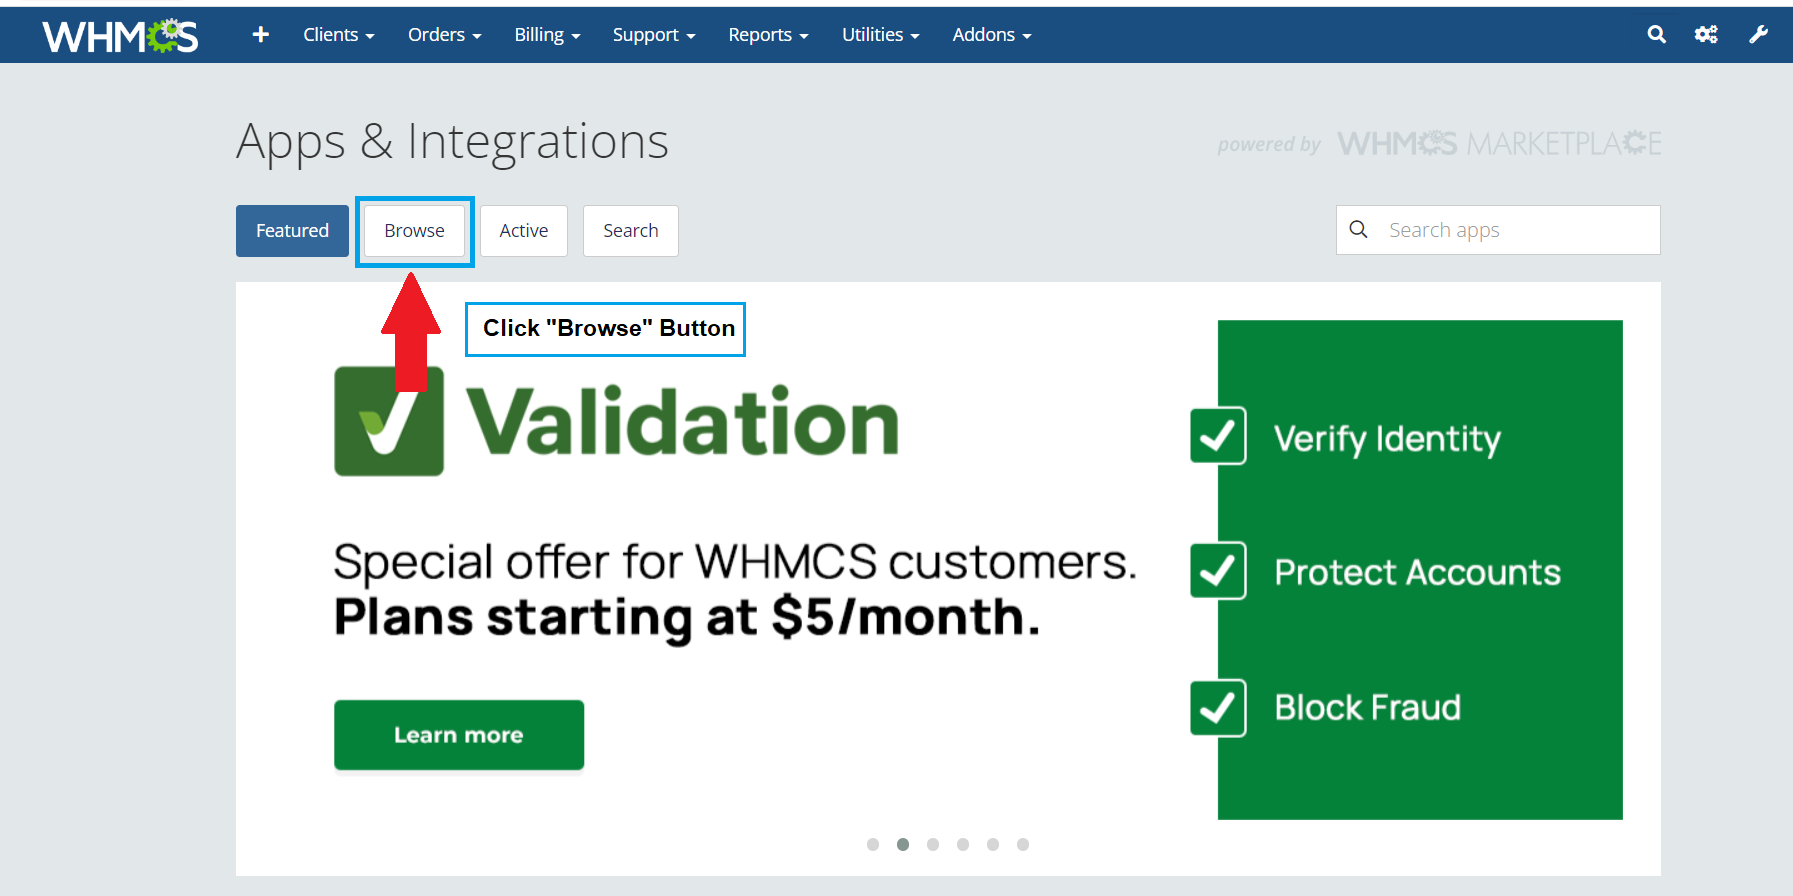
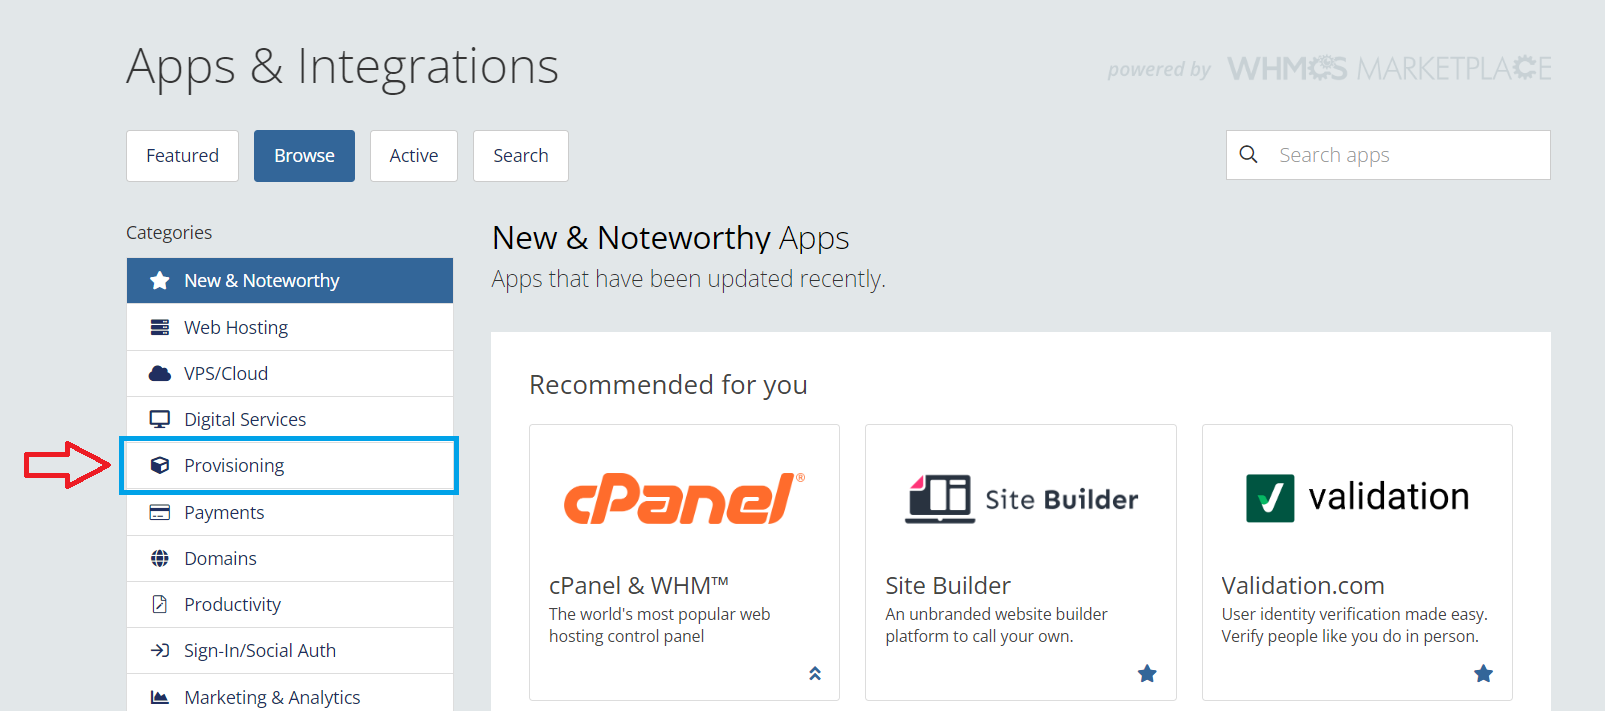
- From WHMCS Admin > Setup > Apps & Integrations > Browse > Provisioning
- Select “Apps & Integrations” from Configuration Menu Items
- Choose “Browse” Option
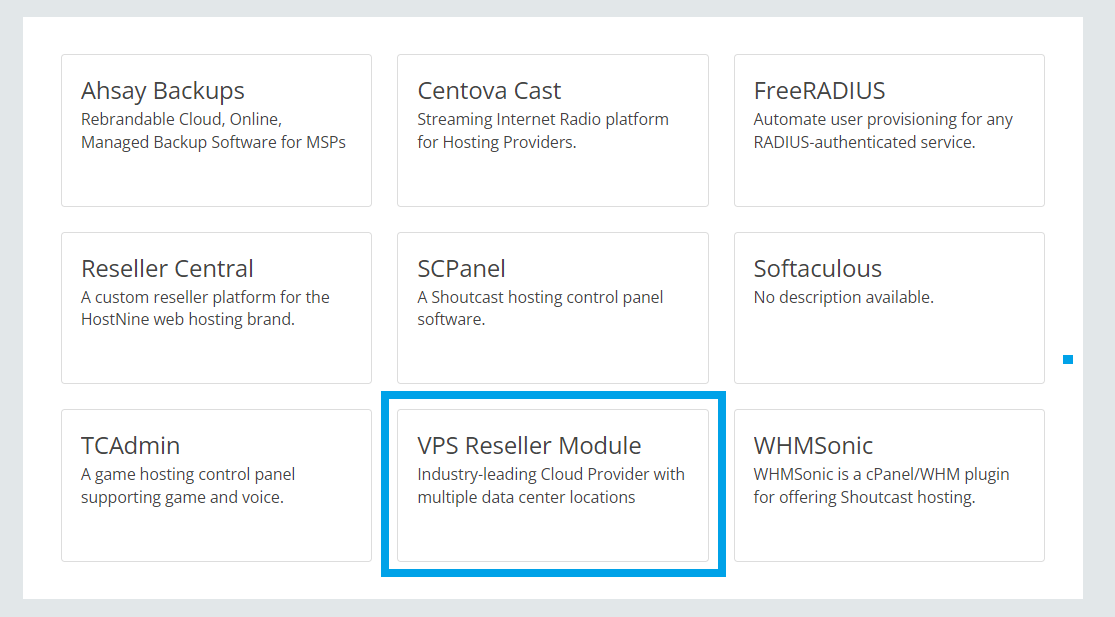
- Choose “Provisioning” category
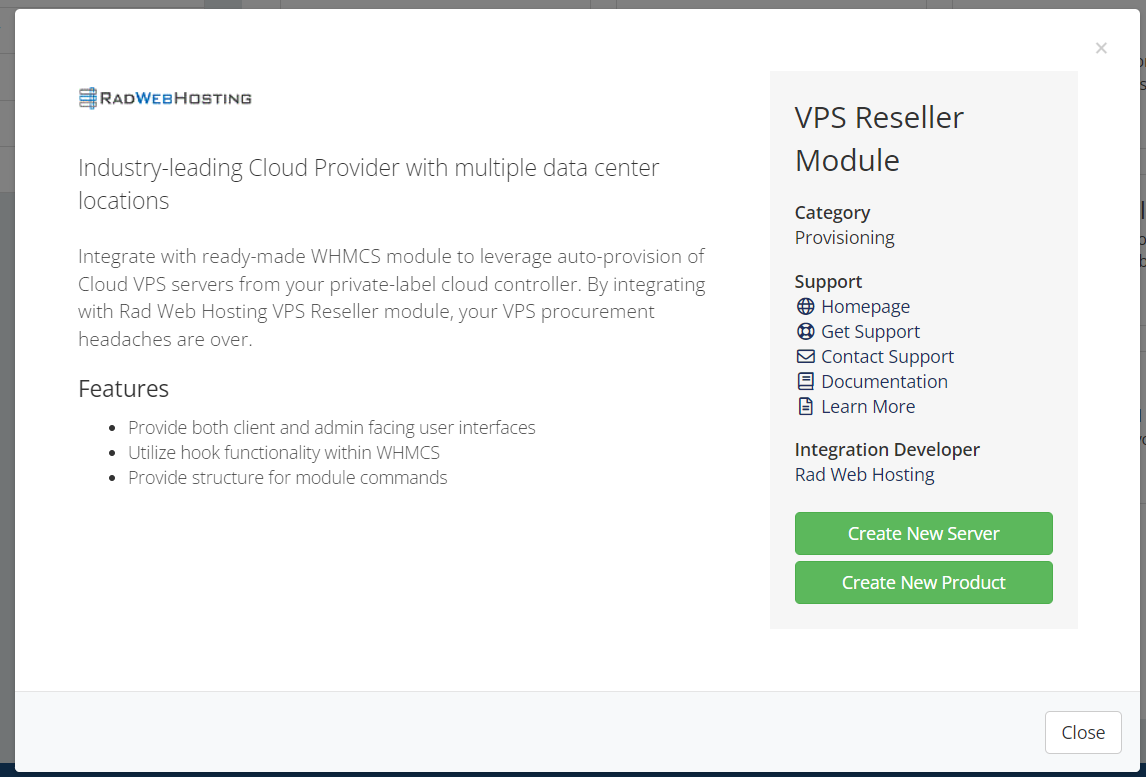
- Click the “VPS Reseller Module”
- Viewing VPS Reseller Module Application Details
You can also access this interface directly with the following URL:
{your_whmcs_admin_url}/apps/app/servers.rad_cloudFor example, if your WHMCS Admin is at
https://yourdomain.com/admin, then you will access:https://yourdomain.com/admin/apps/app/servers.rad_cloud
- Select “Apps & Integrations” from Configuration Menu Items
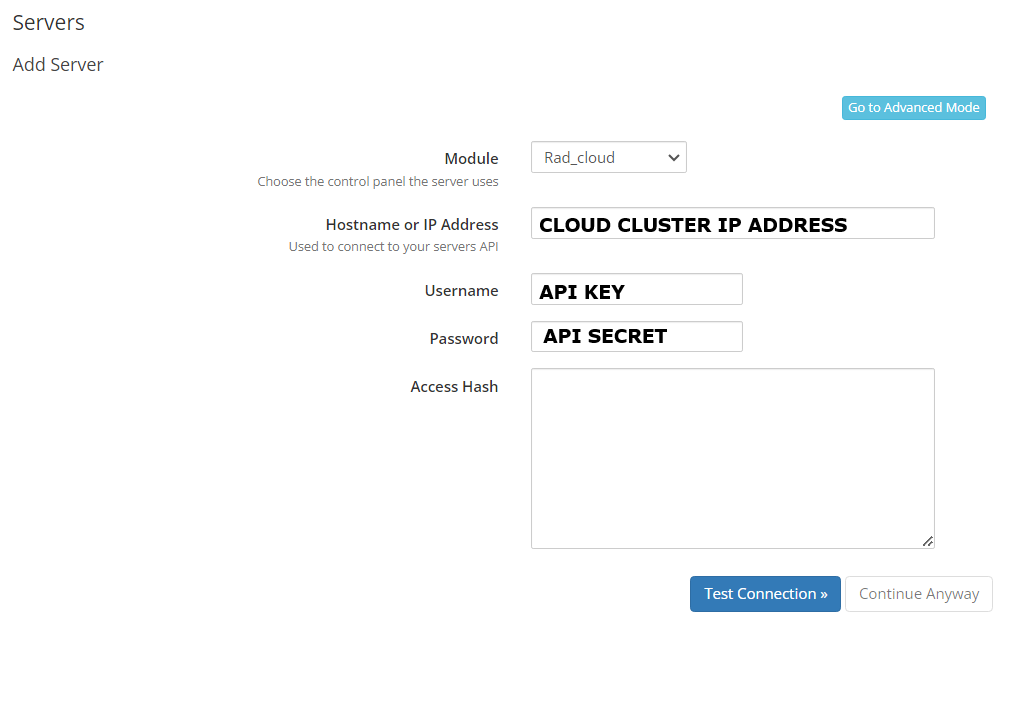
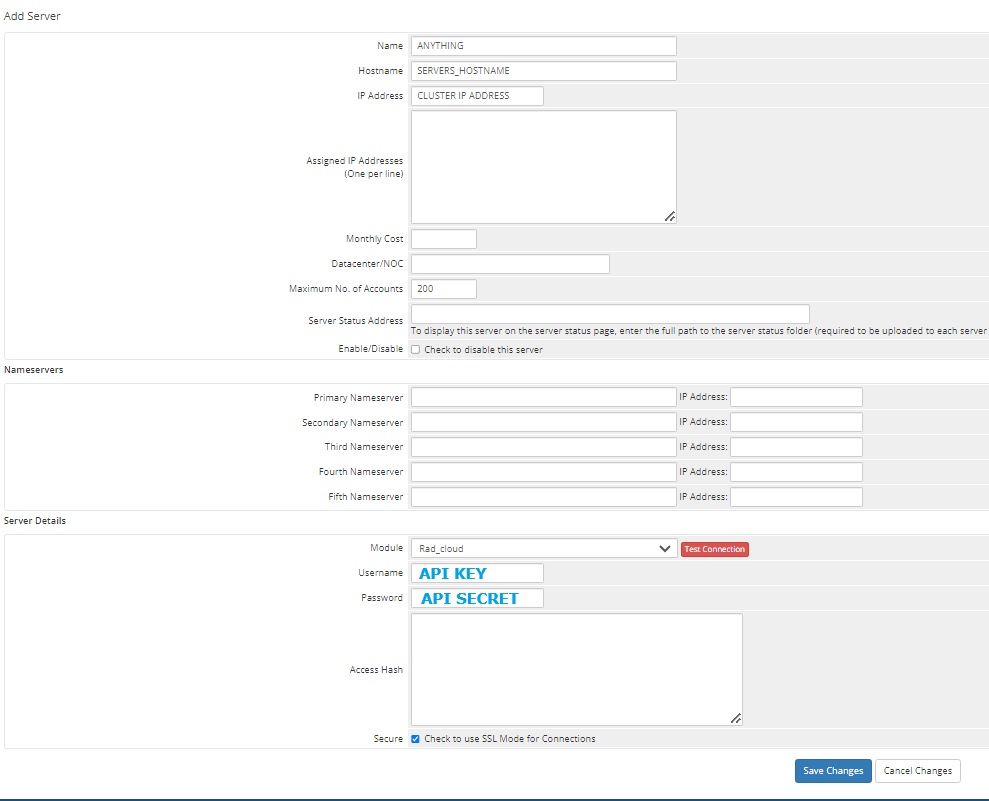
- Click “Create New Server”. Follow directions:
-
- Module: Rad_cloud
- Hostname of IP Address: IP Address (provided in Welcome Email)
- Username: API KEY (provided in Welcome Email)
- Password: API PASSWORD (API SECRET) (provided in Welcome Email)
Enter the values in the provided fields:
- Click “Test Connection” to validate configuration
- Click “Add Server” to add this server to WHMCS
You can verify the connection from WHMCS Admin > Setup > Apps & Integrations > Active:
Create Product
-
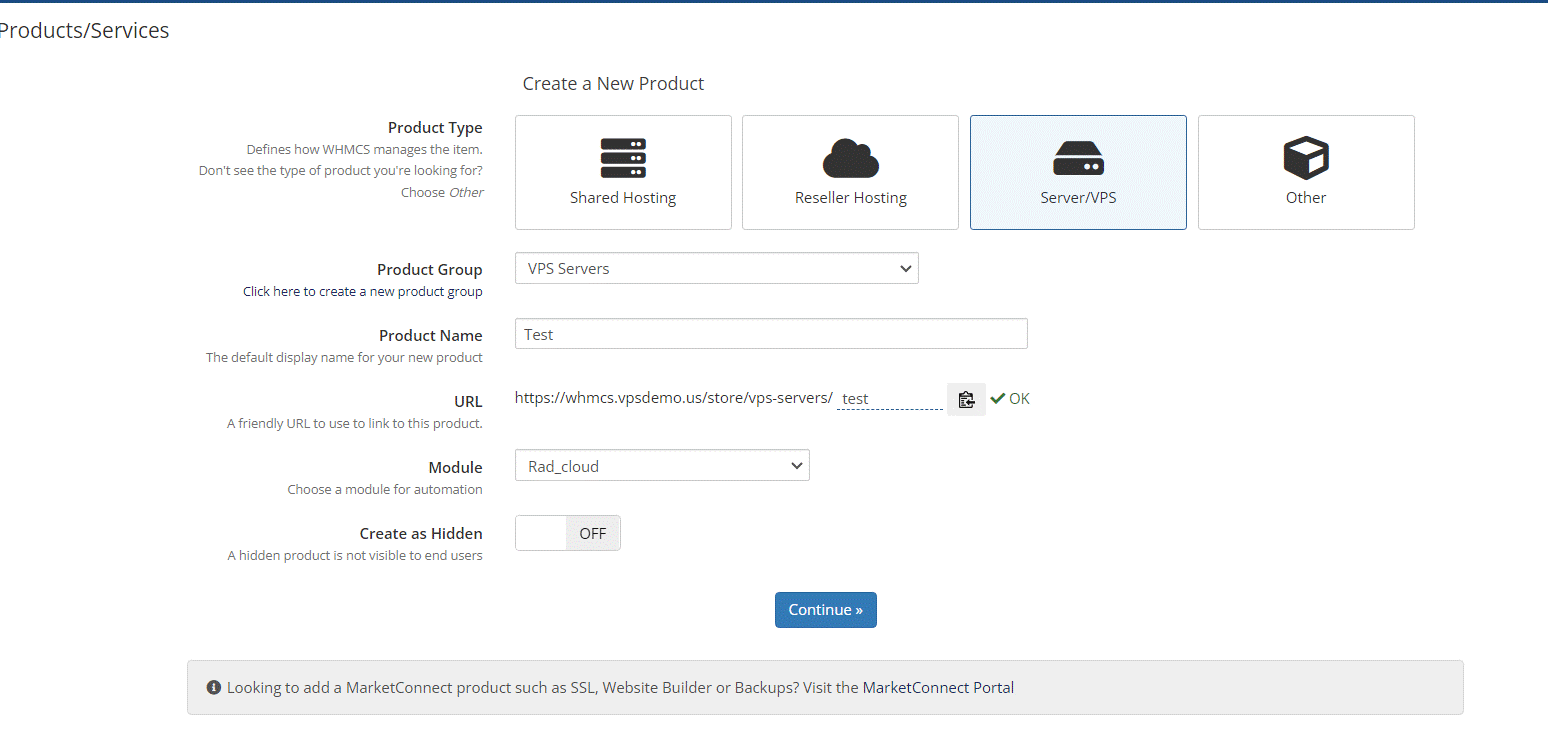
- Navigate to Setup > Products/Services > Products/Services.
- Select “Create a new Product”
- Product Type: Server/VPS
- Product Group: Any
- Product Name: Any
- Click “Continue” to Add product and access Product Settings
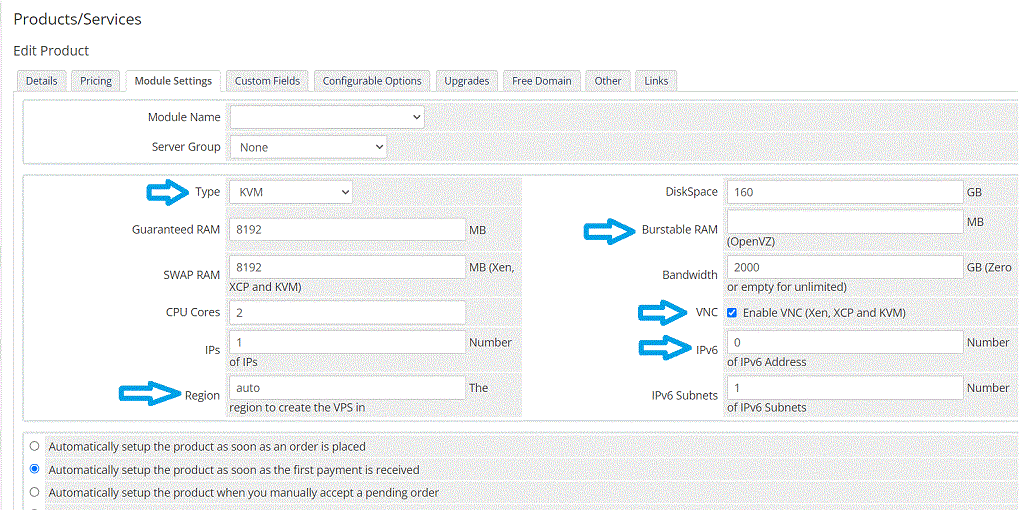
- Go to “Module Settings” tab and enter the following details:
- Module: Rad_cloud
- Required Module Settings: these settings must be set with the following values (or provisioning automation will fail)
- Type: KVM
- Burstable RAM: (empty)
- VNC: (Tick Box) Yes
- Configure Module Settings: These fields should be configured as per your desired product values
- Disk Space: integer (in GB)
- Guaranteed RAM: integer (in MB; 1024MB=1GB)
- SWAP RAM: integer (in MB; 1024MB=1GB)
- Bandwidth: integer (in GB)
- CPU Cores: integer
- IPs: integer
- IPv6: integer
- IPv6 Subnets: integer
- Region: “USA”
- Select “Automatically setup the product as soon as the first payment is received” (for automated provisioning workflow)
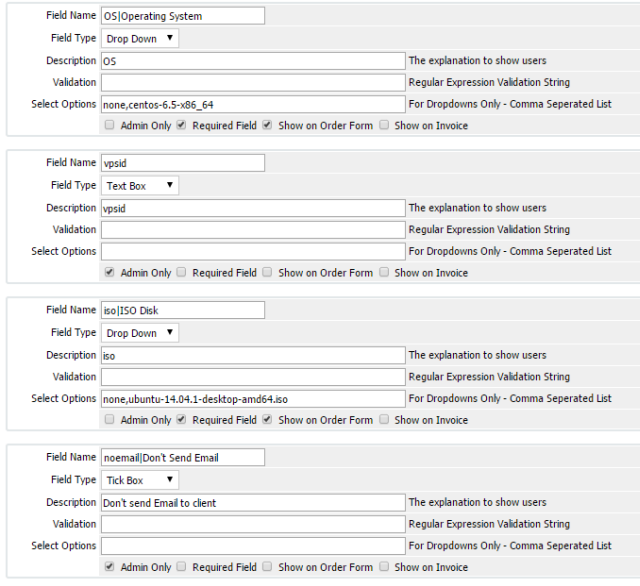
- Go to “Custom Fields” tab and create required Custom Fields:
-
- Field Name: vpsid
- Field Type: Text Box
- Description: The ID of the server from VPS Panel.
- Validation: (empty)
- Check Admin Only tick box.
-
- Field Name: OS or OS|Operating System
- Field Type: Drop Down
- Description
- Validation: (empty)
- Select Options: (Comma-separated values of OS template file names-remove “.img” file extension) – Click here to get available OS templates
- Example values: centos-8.2-x86_64,debian-11-x86_64,ubuntu-22.04-x86_64
- Check Required Field and Show on Order Form tick boxes.
-
(Recommended) Optional WHMCS Integration Customization
We recommend to create a new VPS welcome email template, rather than use the default template provided with WHMCS.
We have provided a custom email template to use for sending VPS server credentials to end-user when VPS is provisioned (created). This template will utilize merge fields and organize important server details better than the default “VPS/Dedicated Server Welcome Email” template that is provided with WHMCS. How to add custom Welcome Email template:
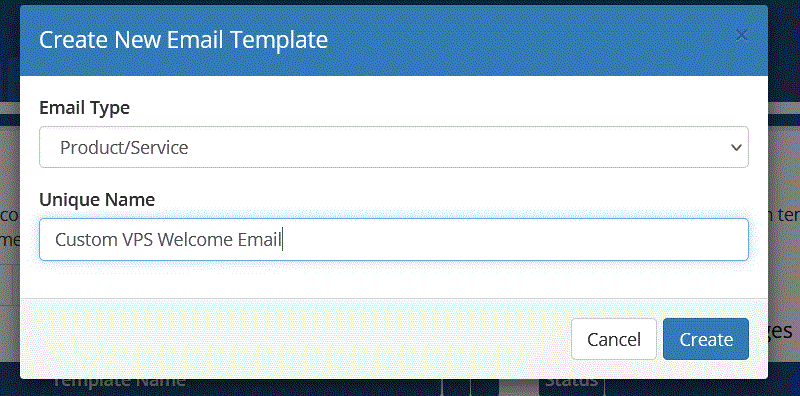
- In WHMCS admin area, navigate to “Setup->Email Templates”
- Choose to “Create New Email Template”
- Select “Product/Service” from the “Email Type” drop-down menu and give the template a unique name
- Configure the email sending settings
- Add a subject for your email (i.e. “New VPS Server Details”)
- To import our pre-made template, click “Enable/Disable Rich-Text Editor” button
- Copy and paste the email template from below:
This is a basic template layout and you can customize or add additional details, if desired.
WHMCS Product Configuration Tips
In order to enable automated provisioning, the product must be configured with a valid “Operating System” value. This value can be configured with either a product Custom Field or Configurable Option. With either method, it is possible to declare the Operating System value from the Order Form during product configuration (client makes selection during checkout process).
We recommend using the Configurable Option method to declare the Operating System value, as future modifications (such as availability of new OS template) are simpler.
Values for Available OS Templates
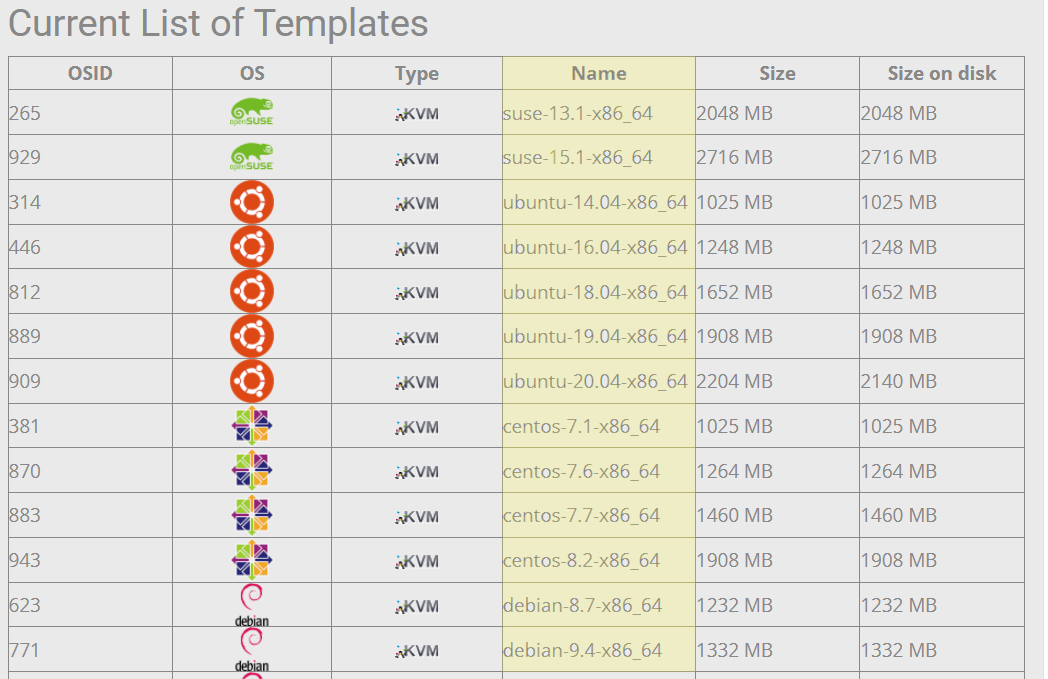
Rad Web Hosting keeps a public list of available KVM OS templates in the Knowledgebase, at: VPS Guides -> List of Available OS Templates
The highlighted values from the “Name” column (shown in the below image) are the API-acceptable values for operating system templates. For example, “centos-8.2-x86_64” or “ubuntu-20.04-x86_64” (without parenthesis) would be the correct values required by the API.
Create Operating System selection via Product Configurable Options
Using Configurable Options to configure order form Operating System selection is more extensible and easier to manage from an administrative perspective if you plan to offer multiple VPS products. The Product Custom Fields OS selection values are assigned directly to each individual product, and thus require more efforts to make a change to the OS selector, like adding a new operating system template. With custom fields OS method, the simple addition of 1 new template requires manual modification of each product’s custom fields.
With Operating System Configurable Options implementation, a single Configurable Option can be assigned to multiple products, and an update to the Configurable Option values automatically applies to all assigned products. In this type of situation, Configurable Options can provide the same results while also reducing the number of database entries written and reduces administrative work when changes are needed.
Follow the steps to add Operating System selection via Product Configurable Options:
- Create new Configurable Options group
- Add new Configurable Option named “Operating System” (exact name required)
- Select “Drop-Down” from the Format options
- For each Operating System template option you wish to offer, enter the value exactly as it appears in the “Name” field from the table provided in the List of Available OS Templates (as described above)
- Assign the Configurable Options group to VPS products by selecting the Product Names from the products list provided in Configurable Options group settings.
Now, the list of OS templates will be presented to client at checkout when a VPS product is added to the Shopping Cart.
For complete details on creating Configurable Options, please refer to this article from WHMCS.
Optional Configurable Options
The WHMCS VPS Reseller module also supports the following Configurable Options:
- Number of IPs – number of IPv4 to add to VPS (Integer)
- Space – amount of disk storage to assign VPS (Integer-in GB)
- RAM – amount of physical memory to assign VPS (Integer-in MB; 1024MB=1GB)
- CPU Cores – number of CPU Cores assigned to VPS (Integer)
- Operating System – selection for KVM template image file to install operating system (name-version-architecture-without “.img” file extension: i.e. “ubuntu-22.04-x86_64”)
You must use the exact names for configurable options (listed in bold above). You can change the output values of configurable options by appending a “|” followed by the desired text.
For example, you can create a configurable option named “Number of IPs|IP Addresses”, which would output “IP Addresses” only, but still function properly with the VPS Reseller module API.

Values configured by Configurable Options take precedence over Product “Module Settings” and “Custom Fields”. For example, if the “RAM” configurable option is provided, this value would be used rather than the value assigned by “Guaranteed RAM” value in “Module Settings”.
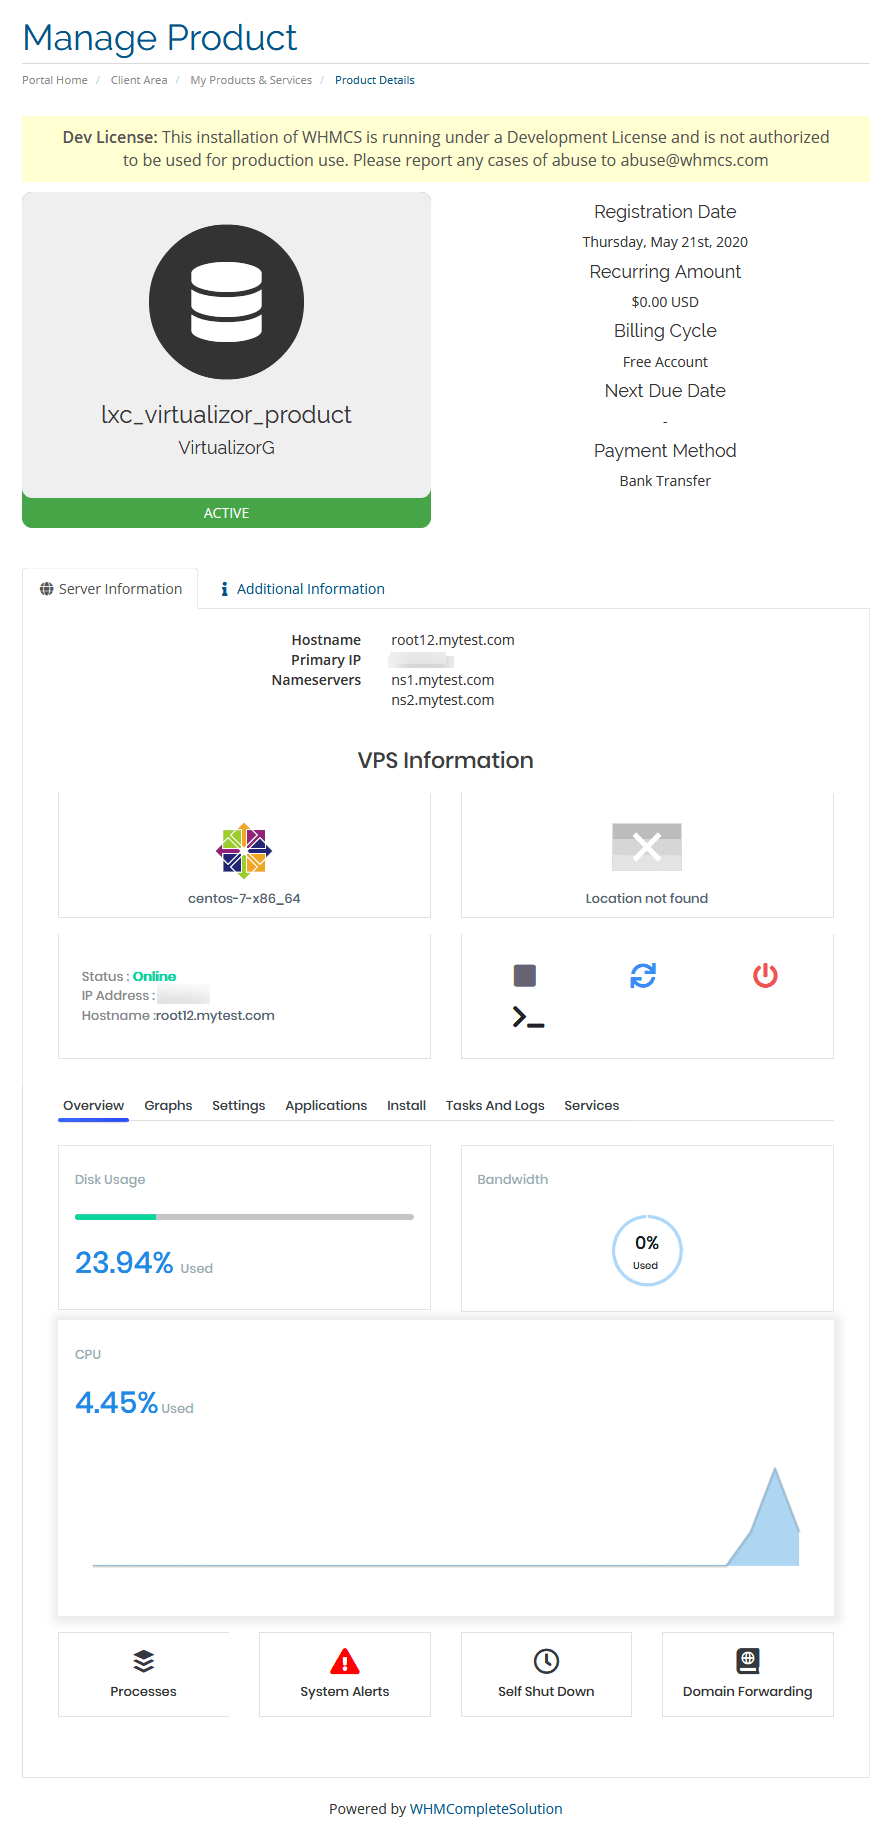
Client Area Features
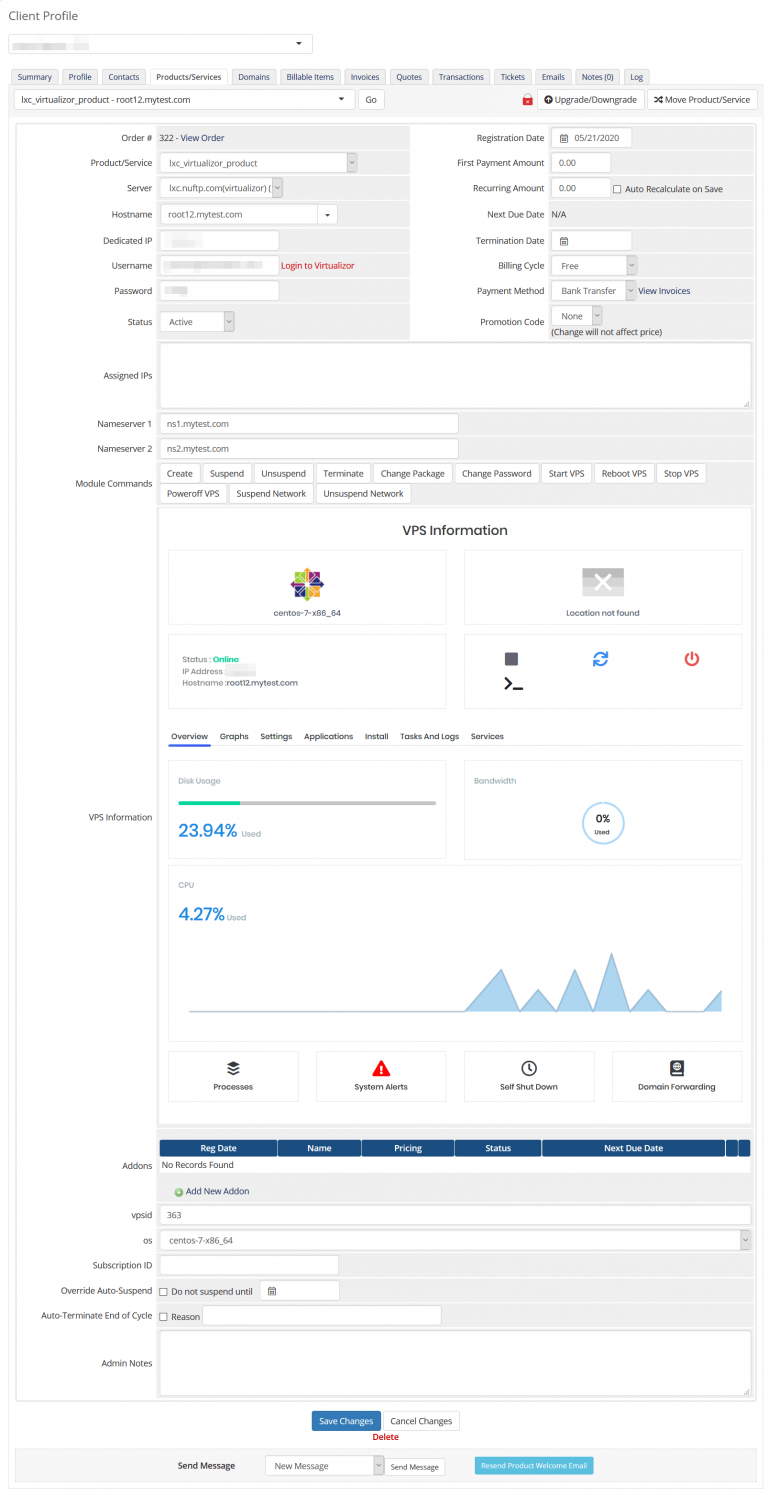
WHMCS Admin Product Management
Where to Download WHMCS VPS Reseller
The latest version of WHMCS VPS Reseller module can be downloaded from multiple third-parties.
Currently, the following Marketplaces/Repositories are confirmed to support the latest updates:


 You can also access this interface directly with the following URL:





[…] How to Integrate VPS Reseller with WHCMS […]
[…] How to Integrate VPS Reseller with WHMCS […]
[…] Read comprehensive WHMCS integration guide: https://blog.radwebhosting.com/how-to-integrate-vps-reseller-with-whmcs/ […]