 This article shows how to partition drives and mount new ext4 file system in Linux VPS or dedicated servers. This guide is intended to help system administrators partition drives and mount new file systems.
The ext4 or fourth extended filesystem is a widely-used journaling file system for Linux. It was designed as a progressive revision of the ext3 file system and overcomes a number of limitations in ext3.
It has significant advantages over its predecessor such as improved design, better performance, reliability, and new features. Although it is best suited for hard drives, it can also be used on removable devices.
READ ALSO: Choosing a Dedicated Server Operating System
This article will show you how to partition drives and mount new ext4 file system in Linux. We will first look at how to create a new partition in Linux, format it with the ext4 file system and mount it.
How to Partition Drives and Mount New ext4 File System
Note: For the purpose of this article:
- We will assume that you have added a new hard drive to your Linux machine, in which you will create the new ext4 partition, and
- You are logged in to SSH as root user, or
- If you are operating the system as an administrative user, use the sudo command to gain root privileges to run the commands shown in this article.
Creating a New Partition in Linux
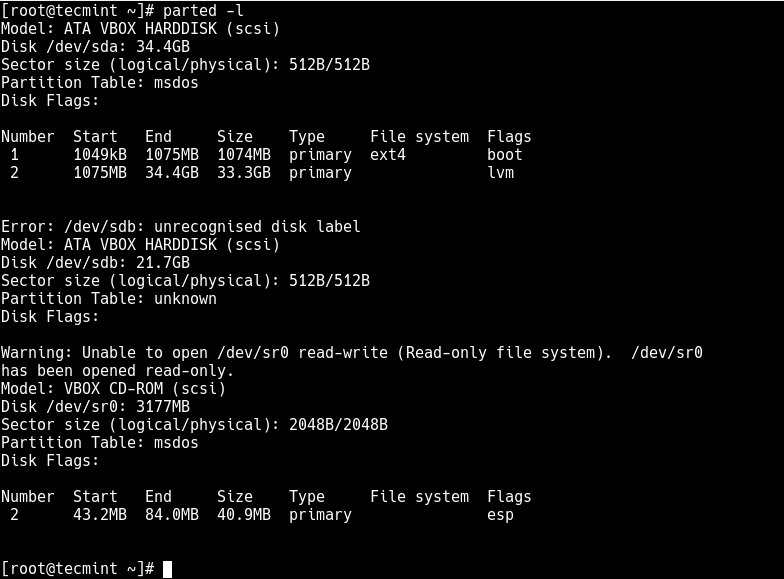
List the partitions using the fdisk -l or parted -l commands to identify the hard drive you want to partition.
# fdisk -l
OR
# parted -l
 List Linux Partitions
Looking at the output in the screenshot above, we have two hard disks added on the test system and we will partition disk /dev/sdb.
Now use parted command to start creating the partition on the selected storage device.
# parted /dev/sdb
Now give the new disk a label using the mklabel command.
(parted) mklabel msdos
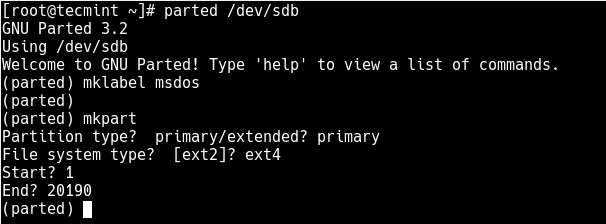
Then create a partition using the mkpart command, give it additional parameters like “primary” or “logical” depending on the partition type that you wish to create. Then select ext4 as the file system type, set the start and end to establish the size of the partition:
(parted) mkpart
Partition type? primary/extended? primary
File system type? [ext2]? ext4
Start? 1
End? 20190
Create a New Ext4 Partition
To print the partition table on the device /dev/sdb or detailed information about the new partition, run the print command.
(parted) print
Print Partition Table
Now exit the program using the quit command.
READ ALSO: How to Choose the Best VPS Hosting Services
Formatting New Ext4 Partition
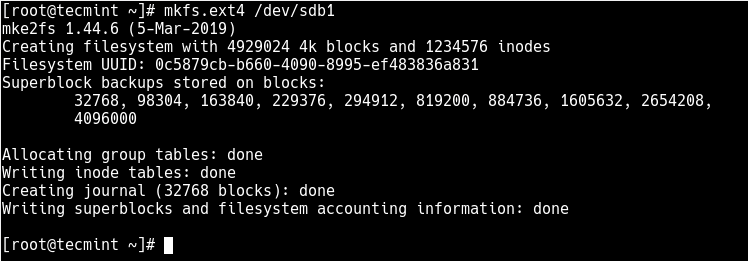
Next, you need to properly format the new partition with the ext4 file system type using the mkfs.ext4 or mke4fs command as follows.
# mkfs.ext4 /dev/sdb1
OR
# mke4fs -t ext4 /dev/sdb1
Format a New Ext4 Partition
Then label the partition using the e2label command as follows.
# e2label /dev/sdb1 disk2-part1
Mounting New Ext4 Partition in File System
Next, create a mount point and mount the newly created ext4 partition file system.
# mkdir /mnt/disk2-part1
# mount /dev/sdb1 //mnt/disk2-part1
Now using the df command, you can list all file systems on your system together with their sizes in a human readable format (-h), and their mount points and file system types (-T):
# df -hT
Show Linux Filesystem with Mount Points
Lastly, add the following entry in your /etc/fstab to enable persistent mounting of the file system, even after a reboot.
/dev/sdb1 /mnt/disk2-part1 ext4 defaults 0 0
Resources
- Read Also: Command Line Tools for Managing Linux Server
- Visit our Linux Administration Knowledgebase
