 This article provides a guide for how to install CyberPanel on cloud VPS server from Rad Web Hosting.
What is CyberPanel?
CyberPanel is a high-performance panel designed to be simple and easy to use with an intuitive web interface. It is built on the LiteSpeed web server to maximize performance and the free version (which we will use) uses OpenLiteSpeed open source web server.
Features of CyberPanel:
- OpenLiteSpeed Web Server
- Multiple PHP versions (5.6 – 8.1, 8.0 as default)
- DNS Server (Bind) with clustering capabilities
- POP/IMAP/SMTP mail services with Anti-Virus, Anti-Spam, and Webmail (ClamAV, SpamAssassin, Sieve, Roundcube)
- MariaDB and/or PostgreSQL databases
- Let’s Encrypt SSL support with wildcard certificates
- Firewall with brute-force attack detection and IP lists (iptables, fail2ban, and ipset).
CyberPanel System Requirements
- Ubuntu 18.04, Ubuntu 20.04, Ubuntu 22.04, AlmaLinux 8, AlmaLinux 9, CloudLinux 8
- Python 3.x
- 1024 MB RAM, or higher
- 10 GB Disk Space (SSD storage recommended!)
READ ALSO: Top 12 Best VPS Control Panels
In our guide, we will install CyberPanel on Cloud VPS from Rad Web Hosting. New clients who want to give it a try, can spin up a cloud VPS with 50% off using promo code: “NEWHERE“! (Applies to new clients only)
Here are specs of the server we are using during this guide:
20 GB Cloud VPS (View plans)
- Cores: 1 vCPU
- Memory: 1 GB RAM
- Storage: 20 GB SSD (RAID 10)
- Network: 1 IPv4 Address + /64 IPv6 Subnet
- OS: AlmaLinux 8 Minimal (64 Bit)
How to Install CyberPanel on Cloud VPS
For reference, after the AlmaLinux 8 install has completed, we have not yet accessed the VPS. So this guide will include every task, from initial login (via SSH) to accessing the CyberPanel control panel from a web browser upon completed installation.
Let’s begin our journey to install CyberPanel on AlmaLinux 8:
- Access your Welcome Email from Rad Web Hosting, containing the details of your Cloud VPS server.
- Using Putty, connect to the IPv4 address (Primary IP) of your server. Login as the root user with the password provided by the web host.
- Once connected, we need to prepare the system for installation. So we will run command “sudo dnf update -y” to ensure everything is up-t0-date.
- We are also aiming for fastest and easiest way to install CyberPanel on cloud VPS. So we will immediately run the CyberPanel installer script, which will handle compiling and installing the entire software base (things our parents had to install individually when they wanted to build CyberPanel servers):
sudo yum update -y sh <(curl https://cyberpanel.net/install.sh || wget -O - https://cyberpanel.net/install.sh)
- Once the script has stopped installing packages, it will ask you some questions on the terminal, which we will need to answer:
CyberPanel Installer v2.1.2 RAM check : 184/981MB (18.76%) Disk check : 7/30GB (27%) (Minimal 10GB free space) 1. Install CyberPanel with OpenLiteSpeed. 2. Install CyberPanel with LiteSpeed Enterprise. 3. Exit. Please enter the number[1-3]:
- Obviously, we are on a tight schedule and an even tighter budget, so we should opt for choice #1-Install CyberPanel with OpenLiteSpeed. It’s free and fast-satisfying the two most important factors for us.
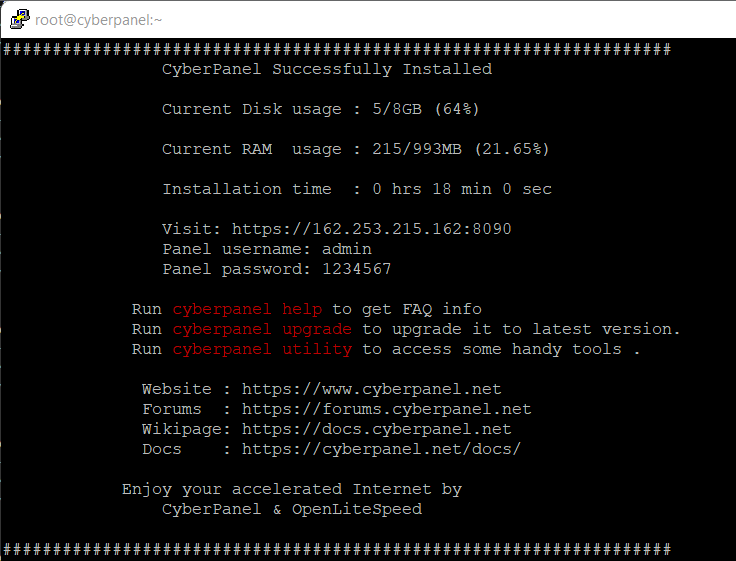
- Once complete, you will be presented with the CyberPanel installer confirmation:

- You can now login to your server from the Web GUI using port 8090:

Conclusion
You have now completed the steps to install CyberPanel on Cloud VPS from Rad Web Hosting. I will leave you now, so you can give your new panel the thorough exploration it deserves.


